Jobs / Work Orders
Jobs
The Jobs / Work Orders module contains all the pages, forms, and reports associated with loads and load setup. Some configurations may be imported by using import documents found at http://www.osmpro.com/setup.html. Other configurations may be completed by import services, if utilized by your organization.
New Order Entry / Job View Screen
The new order entry section allows for the manual creation of orders. The order entry form doubles as the job view form used by all the order pages. This form will also allow the user to make modifications to the order information.
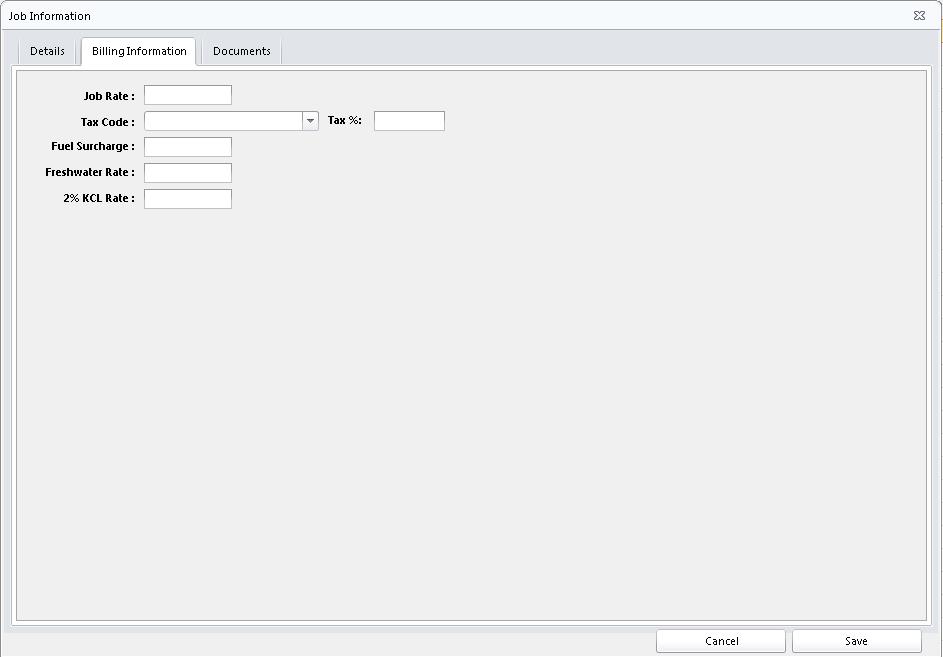
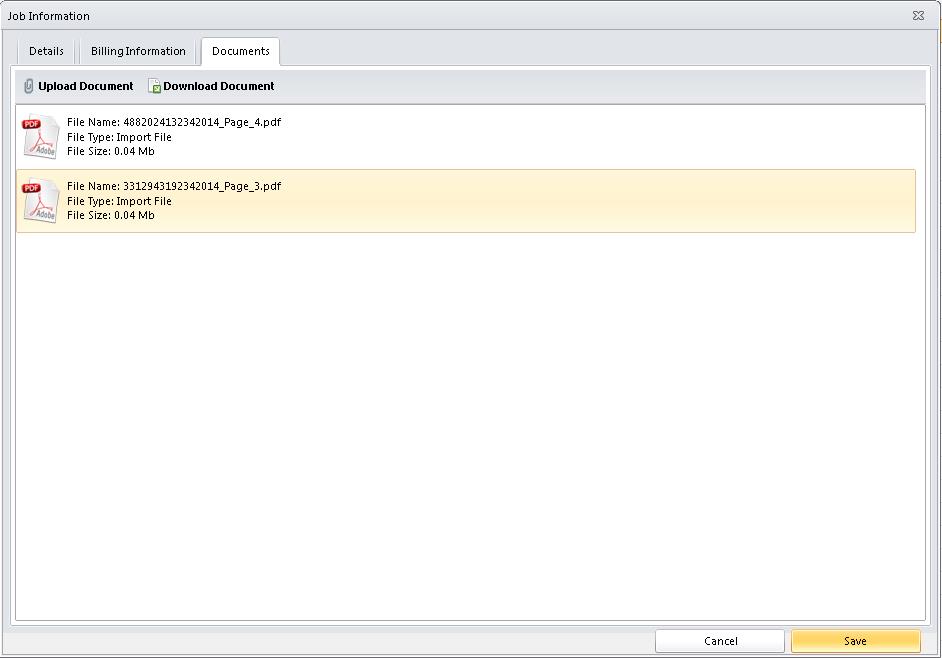
The Job View form is broken down into three tabs. Details, which shows all the detail information about the load. Billing Information, which shows all the billing information about a load including rate, tax code and amounts, and misc. charge rates. Finally, the Documents tab contains all documents that have been uploaded against the load.
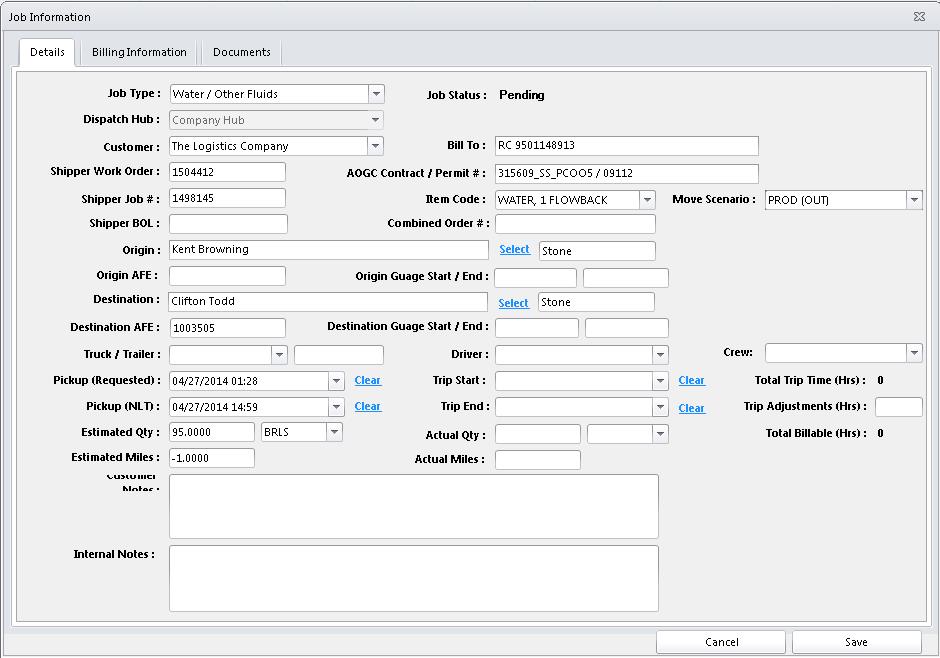
All load information can be modified from the Job View screen. To change origin or destination address click on the Change link after the corresponding address. This will bring up a screen with all addresses for the load’s customer. Select the address you wish to replace the current address with and press the Select button. If you decide you do not want to change the address click the Cancel button.
Pickup Req, Pickup NLT, Trip Start, and Trip End times can also be modified from the Job View screen. If you want to clear one of these fields click the Clear link next to the field you wish to clear.
On the Documents tab, documents can be uploaded by clicking on the Upload Document button. This will open the document upload form. Select the document you wish to upload by clicking on the browse button and navigating to the file. Next select the type of document. Once you are ready to upload the document click the Upload button. If you do not wish to upload a document click the Cancel button. Uploading documents from the Documents tab will only attach the document to the individual job. To download document select the document from the list and click on the Download Document button.
Job Search
The Job Search screen allows you to search for jobs. Jobs can be searched on by different fields. Additional task such as change origin, change destination, combine and spit loads, and upload documents are available on the job search screen.

Once you have filled in the fields you wish to search based on click on the Search button.
Changing Origin Address
The origin address can be changed for orders in the results grid. To change the origin address select at least one load to update using the check box column before the load. Once all the loads are selected click the Change Origin option in the Functions menu. This will bring up a screen with all addresses for the load’s customer. Select the address you wish to replace the current origin address with and press the Select button. If you decide you do not want to change the origin address click the Cancel button.
Changing Destination Address
The destination address can be changed for orders in the results grid. To change the destination address select at least one load to update using the check box column before the load. Once all the loads are selected click the Change Destination option in the Functions menu. This will bring up a screen with all addresses for the load’s customer. Select the address you wish to replace the current destination address with and press the Select button. If you decide you do not want to change the destination address click the Cancel button.
Combining Loads
Loads can be combined by selecting loads on the results grid. To combine loads, select at least 2 loads you want to combine by selecting the check box column in front of the loads. Next select the Combine Order option in the Functions menu.
Splitting Loads
Loads can be split by selecting loads on the results grid. To split loads, select at least 1 load that you want to combine by selecting the check box column in front of the loads. Next select the Split Order option in the Functions menu.
Uploading Documents
OSM Pro allows uploading a single document to multiple jobs. This can be used to attach a BOL to one or more jobs at a single time. To attach documents select the loads you wish to upload documents to by selecting the check box column in front of the order. Next select Upload Document from the Functions menu. This will open the document upload form. Select the document you wish to upload by clicking on the browse button and navigating to the file. Next select the type of document. Once you are ready to upload the document click the Upload button. If you do not wish to upload a document click the Cancel button.
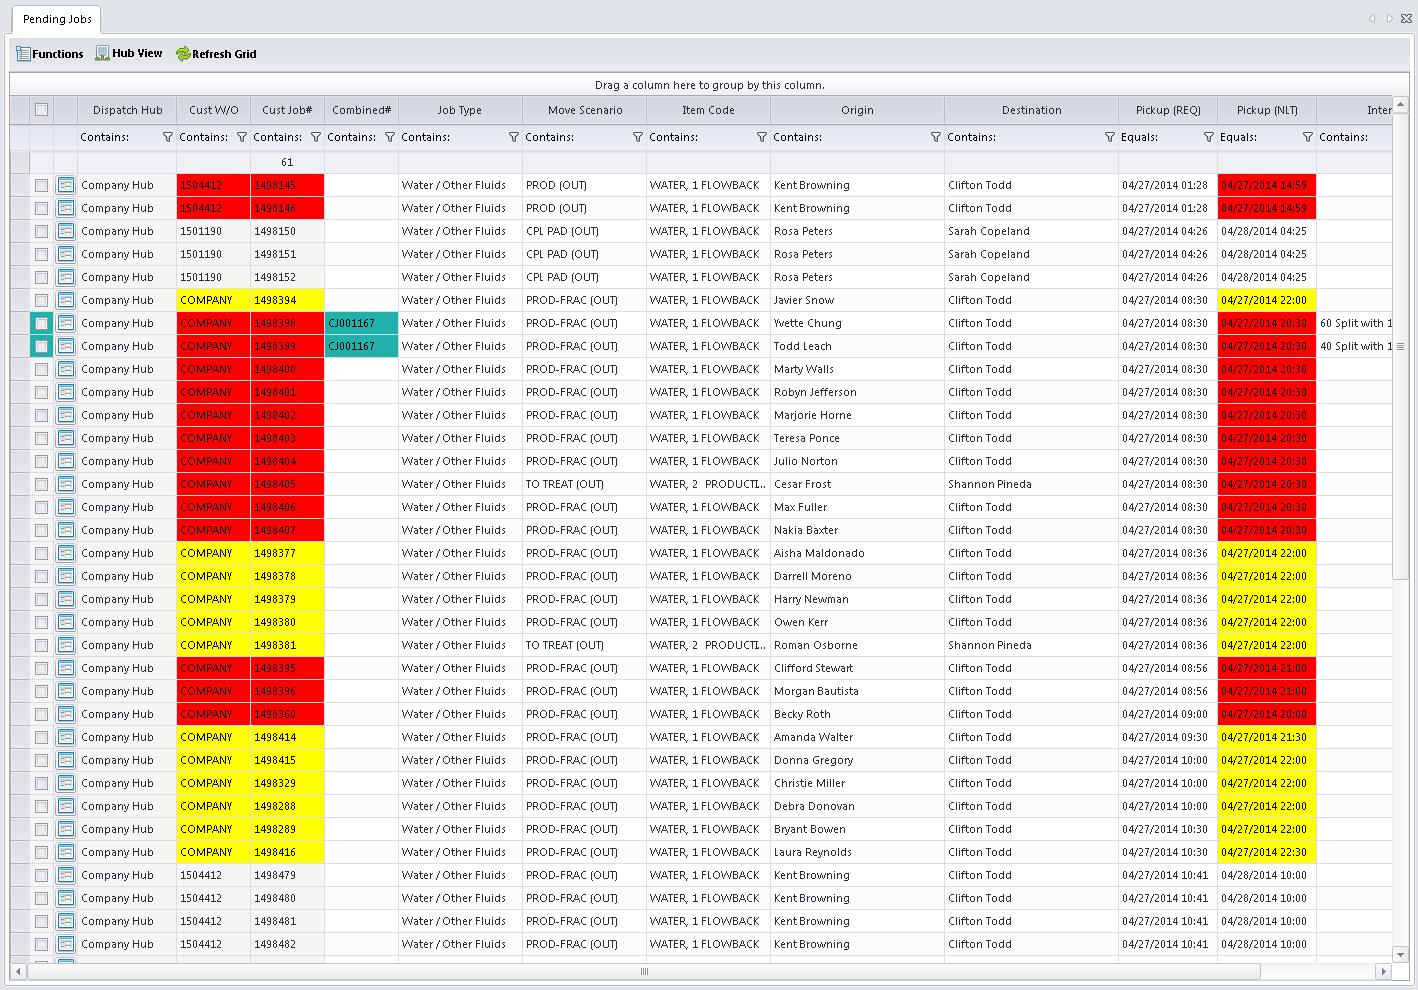
Pending Orders
The pending orders grid shows all the jobs in OSM Pro that have a status of pending. These are jobs that have come in through an import service, or were manually entered or rolled back.Depending your organizations business process orders can be completed from the Pending Orders screen. These orders are then available to the Order Validation Dashboard and the Completed Jobs page. Users can also cancel orders from the Pending Orders screen. Common reasons for cancelling an order would be if a broker sent the same load that was already completed. Other reasons may be that an incorrect order was assigned to your organization.
To view detail information about a pending order click on the ![]() button. This will bring up the Job View Screen which contains all the details about the load.
button. This will bring up the Job View Screen which contains all the details about the load.
The Pending Orders screen contains the following information about the loads.
Changing Origin Address
The origin address can be changed for orders in the grid. To change the origin address select at least one load to update using the check box column before the load. Once all the loads are selected click the Change Origin option in the Functions menu. This will bring up a screen with all addresses for the load’s customer. Select the address you wish to replace the current origin address with and press the Select button. If you decide you do not want to change the origin address click the Cancel button.
Changing Destination Address
The destination address can be changed for orders in the grid. To change the destination address select at least one load to update using the check box column before the load. Once all the loads are selected click the Change Destination option in the Functions menu. This will bring up a screen with all addresses for the load’s customer. Select the address you wish to replace the current destination address with and press the Select button. If you decide you do not want to change the destination address click the Cancel button.
Combining Loads
Loads can be combined by selecting loads on the grid. To combine loads, select at least 2 loads you want to combine by selecting the check box column in front of the loads. Next select the Combine Order option in the Functions menu.
Splitting Loads
Loads can be split by selecting loads on the grid. To split loads, select at least 1 load that you want to combine by selecting the check box column in front of the loads. Next select the Split Order option in the Functions menu.
Uploading Documents
OSM Pro allows uploading a single document to multiple jobs. This can be used to attach a BOL to one or more jobs at a single time. To attach documents select the loads you wish to upload documents to by selecting the check box column in front of the order. Next select Upload Document from the Functions menu. This will open the document upload form. Select the document you wish to upload by clicking on the browse button and navigating to the file. Next select the type of document. Once you are ready to upload the document click the Upload button. If you do not wish to upload a document click the Cancel button.
Completing Loads
Depending on the business process of your organization. Users can choose to force complete a load. This will push the load to billing even though required billing fields may or may not be present. These fields will be able to be populated at a later time in the billing modules of OSM Pro. The primary use of this feature is for organizations who do not wish to utilize the dispatch capabilities of OSM Pro.
User can force complete by selecting the orders they wish to complete by clicking on the check box column before the load. Once they have all the loads they wish to complete they can select Complete Jobs from the Functions menu. This will remove the order from the grid and force it to a complete status and ready for billing department.
Cancel Orders
Load can be cancelled by selecting the orders by clicking on the check box in front of the load. Next select the Cancel option from the Functions menu. This will move the order from a pending status to a cancelled status. The order will only be available on the Cancelled Orders screen in the Jobs / Work Orders module.
Transfer Hubs
Orders can be transferred between hubs setup in OSM Pro. To transfer orders to a different hub select the orders you wish to transfer by clicking on the check box column in front of the load. Next click Transfer To Hub from the Pending Job Functions. This will bring up the transfer form. Select the hub you wish to transfer orders to and click the Transfer button. If you do not want to transfer order click the Cancel button.
Hub View
The Hub View button allows the user to filter what loads they are currently working with. If a user has access to multiple hubs they can view specific hub information by selecting which hub they wish to view.
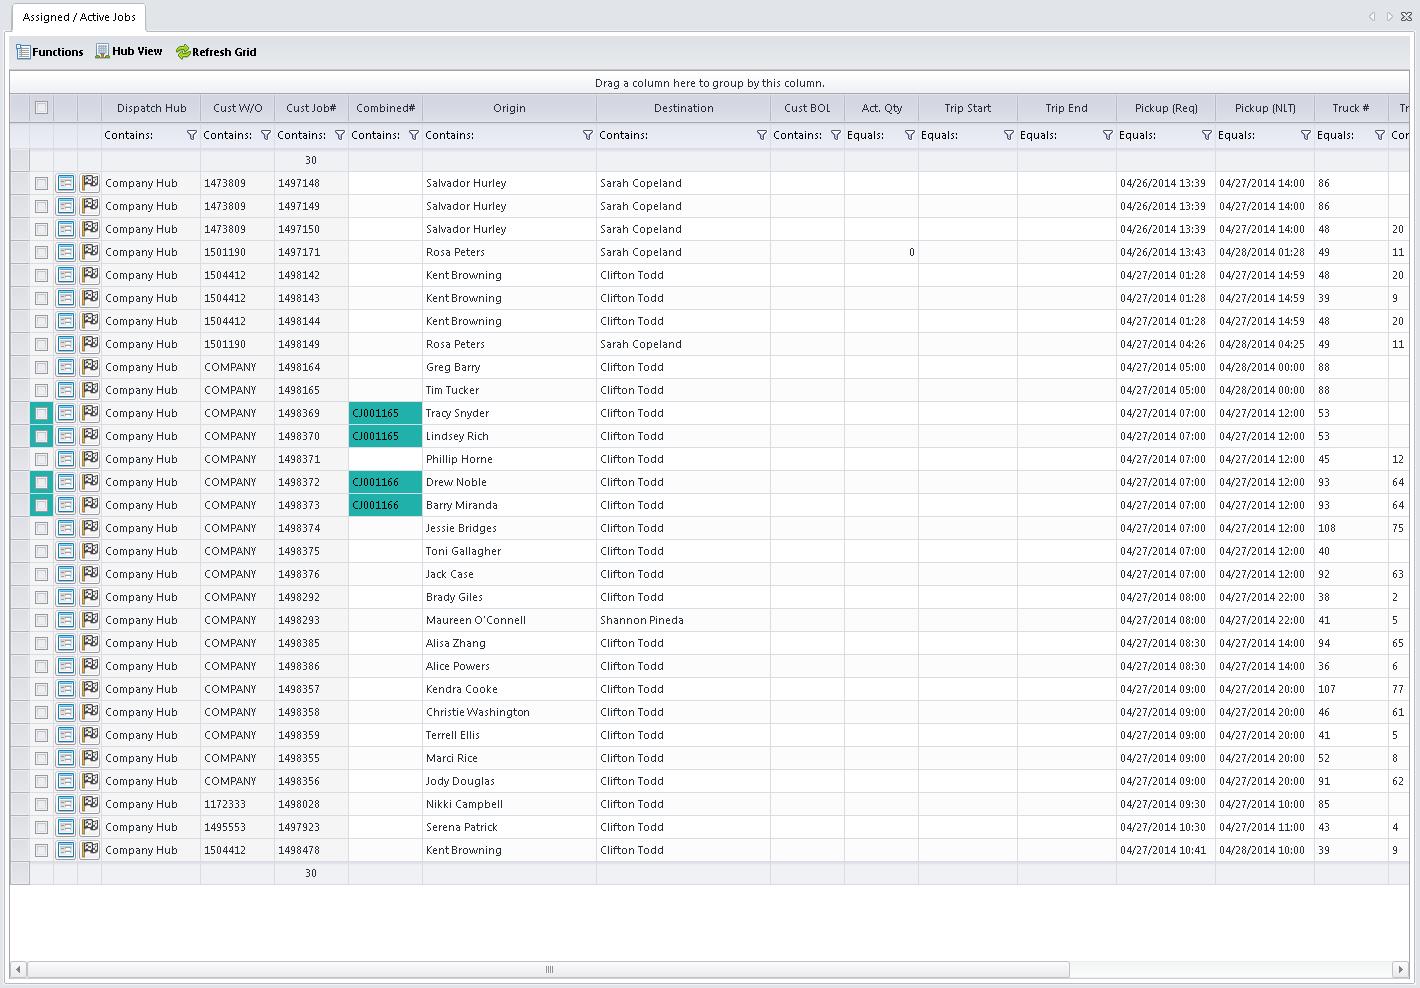
Assigned / Active Orders
The assigned / active orders screen show all orders that have been assigned to a truck using the dispatch dashboard, or orders that have a trip start entered against them. Like the Dispatch Dashboard users can update trip information for loads to complete them through the system.
To view detail information about an assigned or active order click on the ![]() button. This will bring up the Job View Screen which contains all the details about the load.
button. This will bring up the Job View Screen which contains all the details about the load.
To complete an order without all the required information click on the ![]() button. This will mark the order as complete and is available to the billing module and the Order Validation Dashboard.
button. This will mark the order as complete and is available to the billing module and the Order Validation Dashboard.
The Assigned / Active Orders screen contains the following information about the loads.
Changing Origin Address
The origin address can be changed for orders in the grid. To change the origin address select at least one load to update using the check box column before the load. Once all the loads are selected click the Change Origin option in the Functions menu. This will bring up a screen with all addresses for the load’s customer. Select the address you wish to replace the current origin address with and press the Select button. If you decide you do not want to change the origin address click the Cancel button.
Changing Destination Address
The destination address can be changed for orders in the grid. To change the destination address select at least one load to update using the check box column before the load. Once all the loads are selected click the Change Destination option in the Functions menu. This will bring up a screen with all addresses for the load’s customer. Select the address you wish to replace the current destination address with and press the Select button. If you decide you do not want to change the destination address click the Cancel button.
Combining Loads
Loads can be combined by selecting loads on the grid. To combine loads, select at least 2 loads you want to combine by selecting the check box column in front of the loads. Next select the Combine Order option in the Functions menu.
Splitting Loads
Loads can be split by selecting loads on the grid. To split loads, select at least 1 load that you want to combine by selecting the check box column in front of the loads. Next select the Split Order option in the Functions menu.
Completing Loads
Depending on the business process of your organization. Users can choose to force complete a load. This will push the load to billing even though required billing fields may or may not be present. These fields will be able to be populated at a later time in the billing modules of OSM Pro. The primary use of this feature is for organizations who do not wish to utilize the dispatch capabilities of OSM Pro.
User can force complete by selecting the orders they wish to complete by clicking on the check box column before the load. Once they have all the loads they wish to complete they can select Complete Jobs from the Functions menu. This will remove the order from the grid and force it to a complete status and ready for billing department.
Rolling Back Loads
Orders can be rolled back to pending. This feature is available in case a load was forced complete without the required billing information by accident. Rolling back loads will reset their status to pending. To roll back loads select the loads you wish to roll back by selecting the check box column in front of the load. Next select Rollback To Pending from the Functions menu.
Uploading Documents
OSM Pro allows uploading a single document to multiple jobs. This can be used to attach a BOL to one or more jobs at a single time. To attach documents select the loads you wish to upload documents to by selecting the check box column in front of the order. Next select Upload Document from the Functions menu. This will open the document upload form. Select the document you wish to upload by clicking on the browse button and navigating to the file. Next select the type of document. Once you are ready to upload the document click the Upload button. If you do not wish to upload a document click the Cancel button.
Cancel Orders
Load can be cancelled by selecting the orders by clicking on the check box in front of the load. Next select the Cancel option from the Functions menu. This will move the order from a pending status to a cancelled status. The order will only be available on the Cancelled Orders screen in the Jobs / Work Orders module.
Hub View
The Hub View button allows the user to filter what loads they are currently working with. If a user has access to multiple hubs they can view specific hub information by selecting which hub they wish to view.
Completed Orders
The completed orders section shows all jobs that have a completed status for a given date range. This status is either set when the loads trip end is manually entered in on the Assigned / Active Orders or the Dispatch Dashboard. Loads that have been completed using the Complete Order function on the Pending Orders, Active / Assigned Orders, or the Dispatch Dashboard. Orders that are forced complete may or may not have all required fields needed for billing. At the bottom of the completed orders grid are 2 menu items that will display errors that need to be fixed before being moved to billing. Orders with errors will not pass through to billing. The other menu option will show warnings. These loads are missing information for reports, but will still allow the load to pass to the billing section.
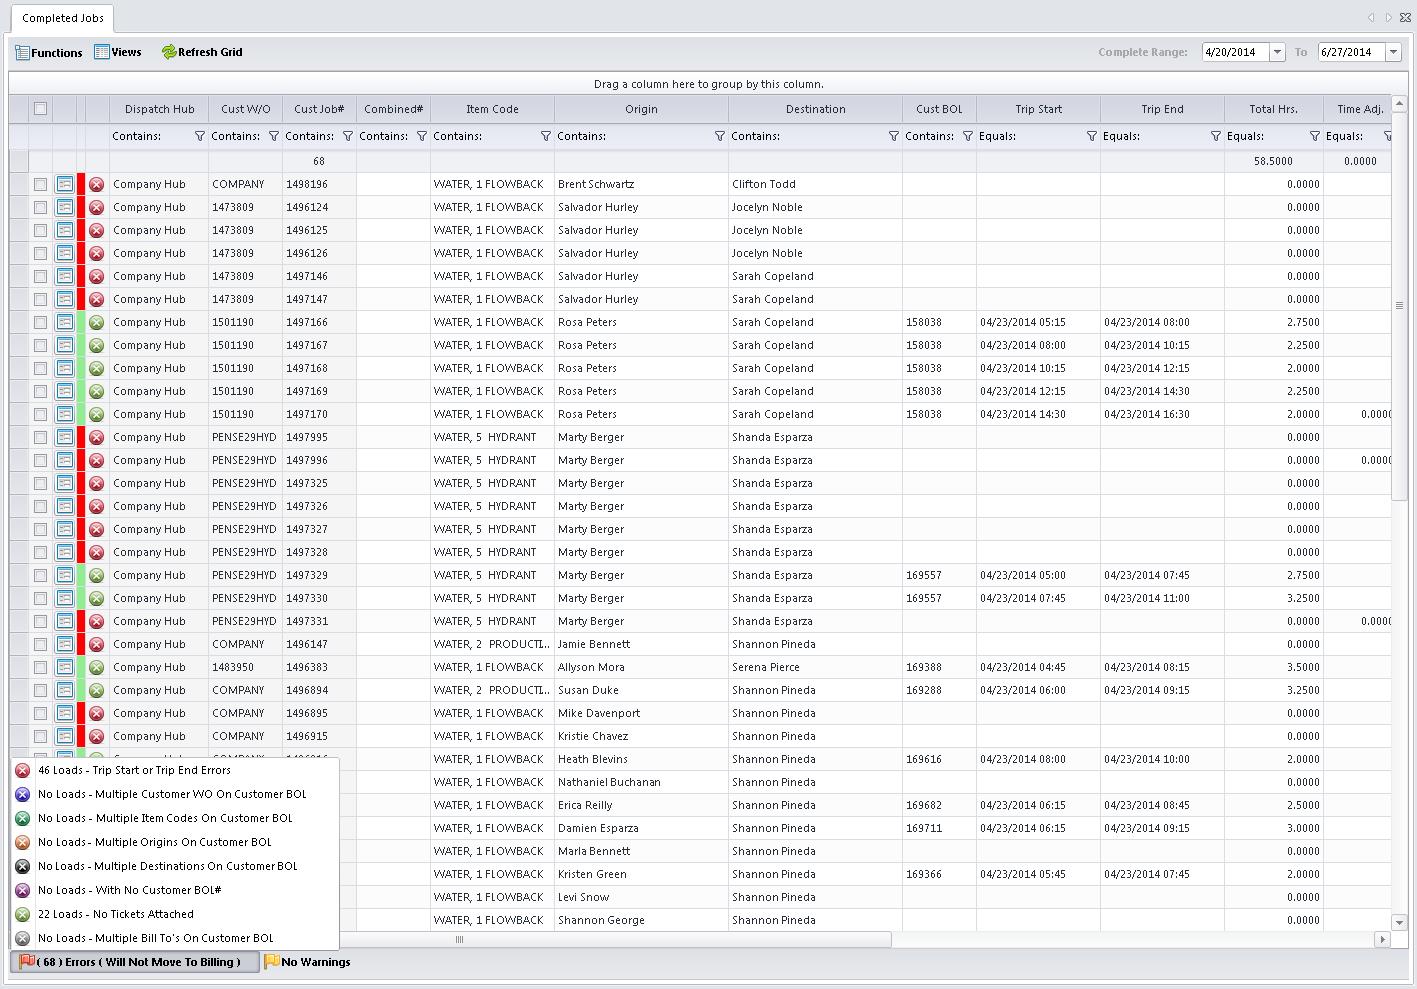
Error Messages
Warning Messages
To view detail information about an assigned or active order click on the button. This will bring up the Job View Screen which contains all the details about the load.
The Completed Orders screen contains the following information about the loads.
Changing Origin Address
The origin address can be changed for orders in the grid. To change the origin address select at least one load to update using the check box column before the load. Once all the loads are selected click the Change Origin option in the Functions menu. This will bring up a screen with all addresses for the load’s customer. Select the address you wish to replace the current origin address with and press the Select button. If you decide you do not want to change the origin address click the Cancel button.
Changing Destination Address
The destination address can be changed for orders in the grid. To change the destination address select at least one load to update using the check box column before the load. Once all the loads are selected click the Change Destination option in the Functions menu. This will bring up a screen with all addresses for the load’s customer. Select the address you wish to replace the current destination address with and press the Select button. If you decide you do not want to change the destination address click the Cancel button.
Combining Loads
Loads can be combined by selecting loads on the grid. To combine loads, select at least 2 loads you want to combine by selecting the check box column in front of the loads. Next select the Combine Order option in the Functions menu.
Splitting Loads
Loads can be split by selecting loads on the grid. To split loads, select at least 1 load that you want to combine by selecting the check box column in front of the loads. Next select the Split Order option in the Functions menu.
Assign To Billing
For loads to be invoiced the must be assigned to billing from the completed job screens. Only jobs that do not have errors can be assigned to billing. Jobs with warnings can be assigned but may be missing billing information that can be entered in before invoicing. To assign orders to billing select orders by clicking on the check box column in front of the load then select the Assign To Billing option in the Functions menu.
Uploading Documents
OSM Pro allows uploading a single document to multiple jobs. This can be used to attach a BOL to one or more jobs at a single time. To attach documents select the loads you wish to upload documents to by selecting the check box column in front of the order. Next select Upload Document from the Functions menu. This will open the document upload form. Select the document you wish to upload by clicking on the browse button and navigating to the file. Next select the type of document. Once you are ready to upload the document click the Upload button. If you do not wish to upload a document click the Cancel button.
Cancel Orders
Load can be cancelled by selecting the orders by clicking on the check box in front of the load. Next select the Cancel option from the Functions menu. This will move the order from a pending status to a cancelled status. The order will only be available on the Cancelled Orders screen in the Jobs / Work Orders module.
Verify Loads
Verifying orders on the Completed Orders screen will mark the selected loads as verified. To verify orders click on the check box in front of the loads and select Verify Orders from the Functions menu. Unlike the Validate Orders Dashboard, verifying loads will not remove them from the completed orders screen.
Job View
The job view menu item allows you to change between viewing verified, unverified, or all orders. For some business processes that use the Validation Order Dashboard, users would want to select the verified orders job view. This will limit the results to only showing verified orders that are ready to be moved to billing.
Hub View
The Hub View button allows the user to filter what loads they are currently working with. If a user has access to multiple hubs they can view specific hub information by selecting which hub they wish to view.
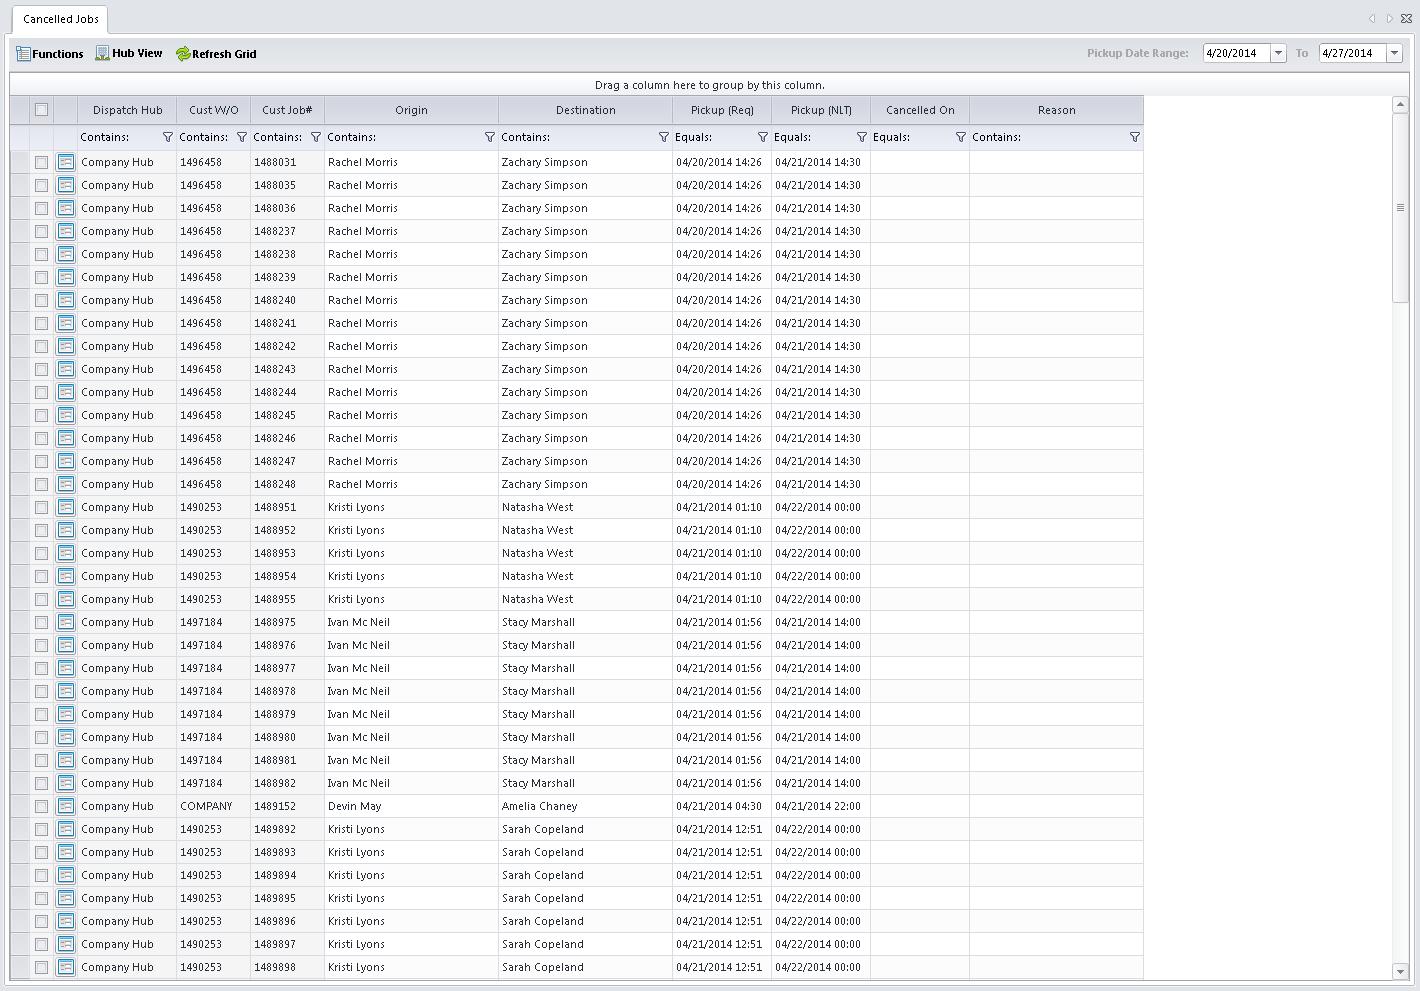
Cancelled Orders
The cancelled orders screen displays all loads that have been cancelled for a given date range. Cancelled orders will be automatically purged from the OSM Pro database after 30 days.
To view detail information about a pending order click on the ![]() button. This will bring up the Job View Screen which contains all the details about the load.
button. This will bring up the Job View Screen which contains all the details about the load.
The Cancelled Orders screen contains the following information about the loads.
Reinstate Order
If an order was cancelled by mistake, it can be reinstated into the OSM Pro system. Reinstated jobs will be reinstated with a pending status. To reinstate orders select the check box in front of the loads you wish to reinstate. Once you have all the loads selected to reinstate select Reinstate Order from the Functions menu.
Purge Order
To purge orders select the check box in front of the loads you wish to purge. Once you have all the loads selected to purge select Purge Order from the Functions menu.
Job Utilities
The job utilities provide additional tools to users to automate job functions. These utilities include uploading Customer BOLs in a batch upload, address changes, and invalid radio responses. These features can be turned on or off using the user security features of OSM Pro.
Batch BOL/Ticket Upload
The batch BOL upload allows the user to upload multiple customer BOLs against multiple jobs. Clicking the Batch BOL Upload will bring up the utility screen.
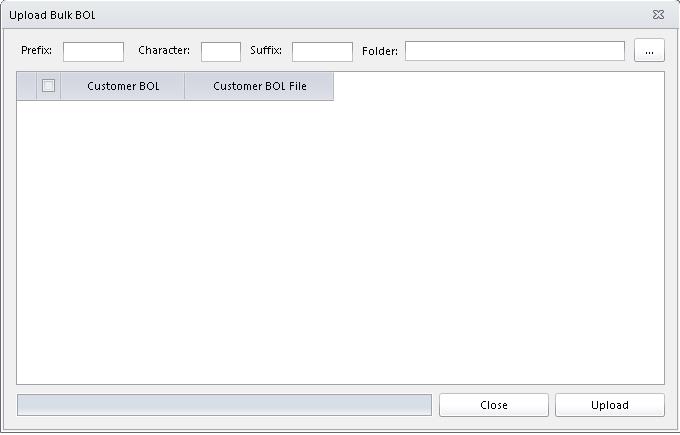
The user can select a folder containing all of the customer BOLs that they wish to upload. Sometimes scanners will put a prefix or a suffix on the file name. You can remove these by putting the prefix or suffix in the appropriate boxes. The grid below should automatically be populated with the files found in the folder.
Please note the file names without the prefix or the suffix must be the same as the customer BOL number. OSM Pro uses this number to link the file to associated jobs. If a job has a customer BOL number that matches the file name the BOL will be attached to that load
Select the files you wish to upload by selecting the check box in front of the file. Once all files have been selected click the Upload button, and OSM Pro will start uploading and linking the files to associated jobs. The progress bar on the bottom left corner of the screen will allow you to see the upload progress. Once complete the grid will clear itself out. If a file is uploaded and there are no jobs to link the file to the file will not upload and will remain in the list of files available for upload.
If you do not want to upload a batch of customer BOLs click on the Close button.
Address Changes
The address change screen will show all jobs where the origin or destination address do not match the original imported addresses for a given time frame. The address change grid shows the following information about the loads.
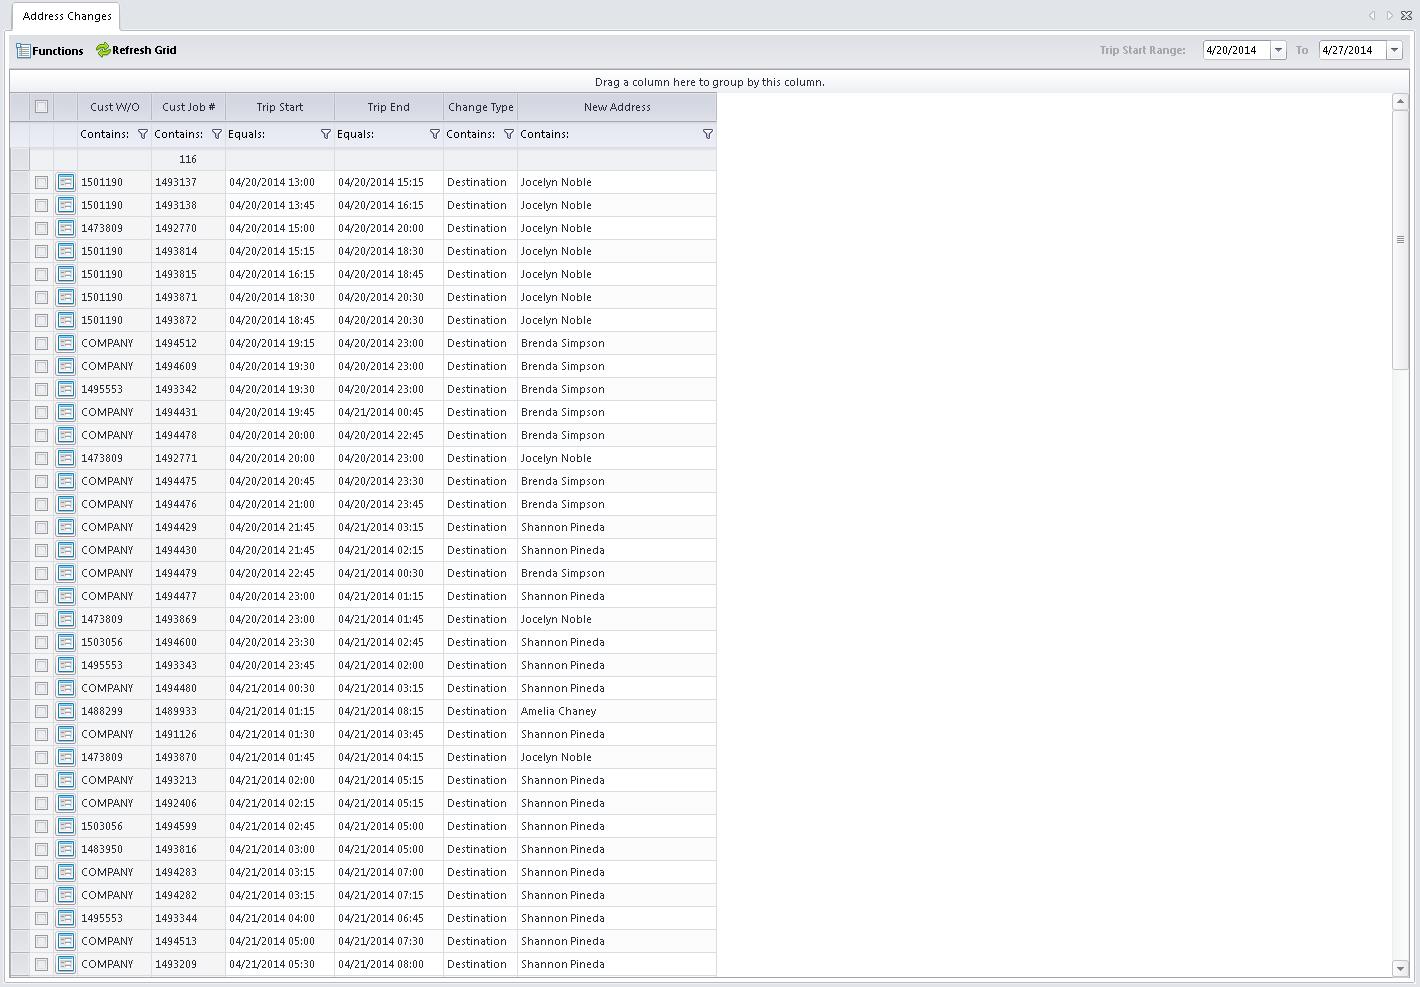
To view detail information about a pending order click on the ![]() button. This will bring up the Job View Screen which contains all the details about the load.
button. This will bring up the Job View Screen which contains all the details about the load.
If an address change was made by mistake the user can change the address from the Job View Screen or they can select addresses that they would like to roll back to the imported value. To roll back selected addresses first select the address you want to roll back by clicking the check box in front of the address change record. Once all addresses are selected use the Rollback To Original Address option in the Functions menu.
Some brokers may want an export of the destination changes. OSM Pro offers a default export that will export the contents of the grid to a csv file. To export address changes first click on the Functions menu. Next select the Export option. Finally, select the type of export you wish to generate. Broker exports will be labeled by the broker name as these exports may include additional fields.
Invalid Radio Responses
The invalid radio responses will list errors that come in from the QualComm macros. If your organization is not using QualComm macros this section can be disabled through the user security. Additional radios may be added at a later time. Invalid radio responses are normally due to invalid job number entry. Invalid radio responses can be corrected and will be reprocessed. You can also choose to clear out invalid radio responses. Invalid responses will remain in the system for 24 hrs. After the 24 hr. period has expired the invalid responses will be purged. The invalid response grid contains the following information.
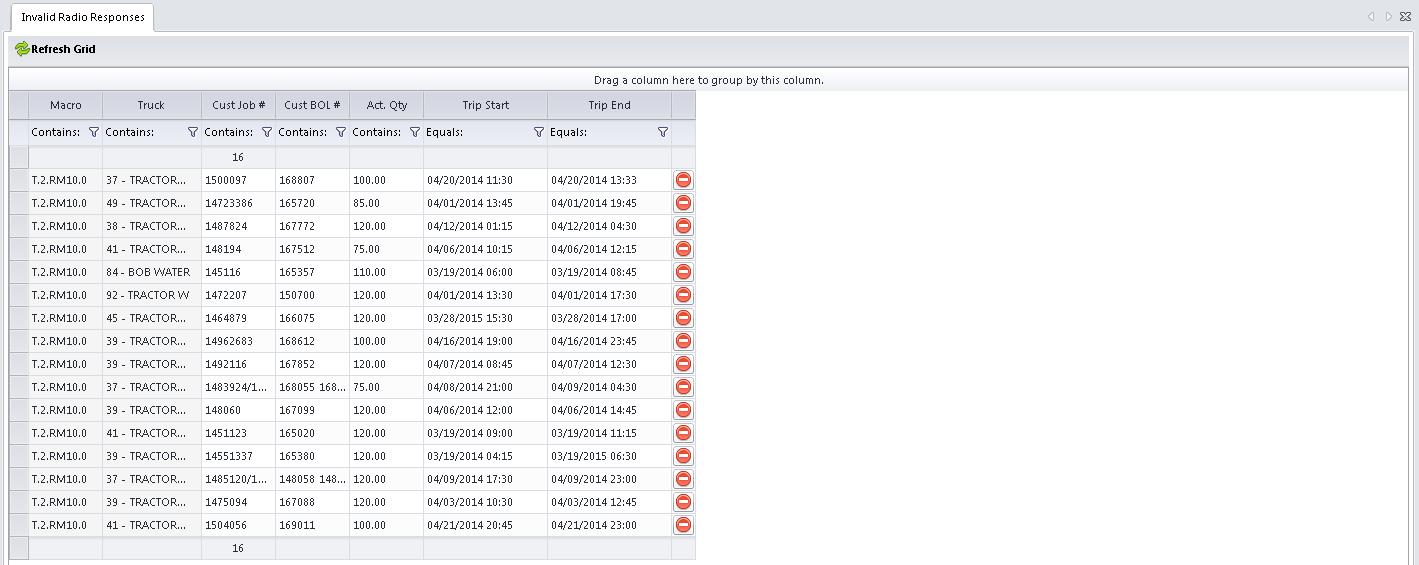
To remove an invalid radio response click on the ![]() button.
button.
Settings
The Job / Work Order settings section will allow the user to configure items used for load processing. These configurations can be entered and updated manually through the following sections. Some of the following settings can be imported by downloading the corresponding documents from http://www.osmpro.com/setup.html. Other configuration options may be automatically created through import processes.
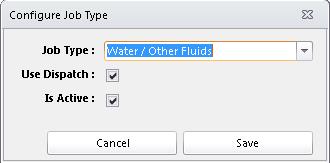
Job Types
Job types cannot be created in OSM Pro. Job types are created by Trinetica LLC due to business logic that may be required for order processing or invoicing. Job types however can be activated by clicking on the New Job Type button. This will load the Job Type Activation screen. The user can select the job type they wish to activate from the drop down list of job types. Next if they want the job type to be available to the Dispatch Dashboard the user can select the Use Dispatch. Finally the user can select the Active option to make the job type active in OSM Pro.

To view or update job type activation information click on the ![]() button. This will bring up the Job Type Activation screen.
button. This will bring up the Job Type Activation screen.
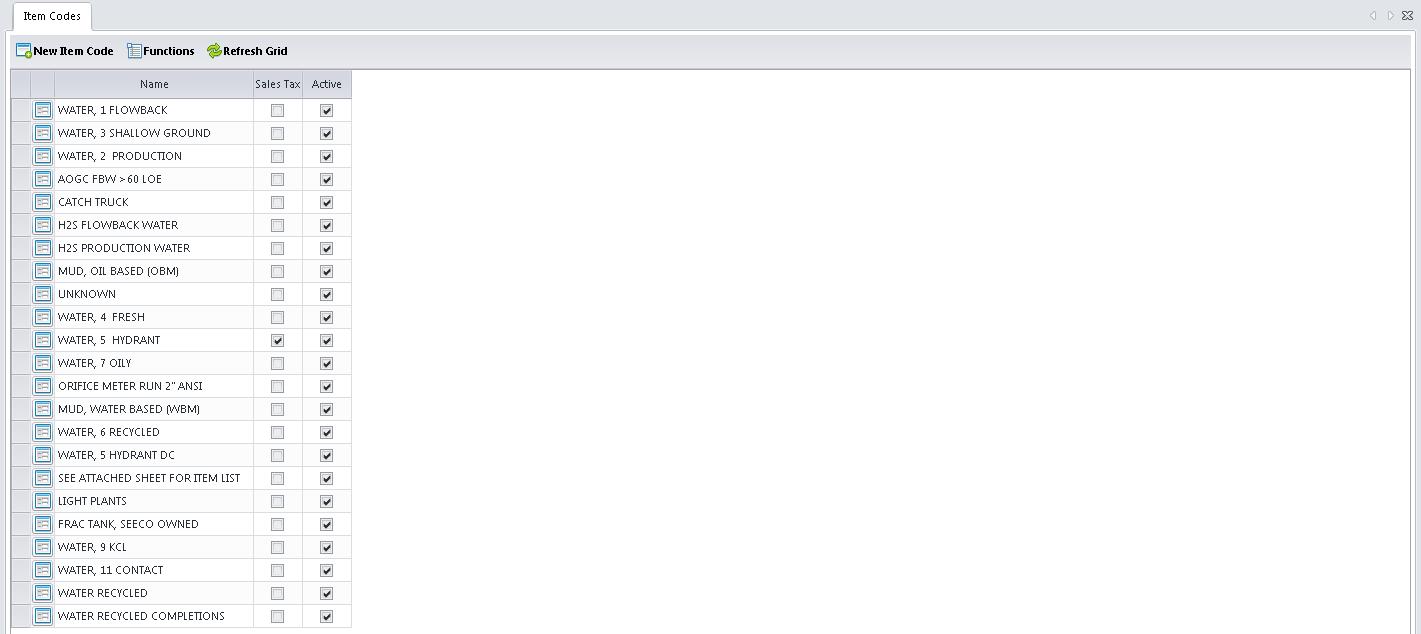
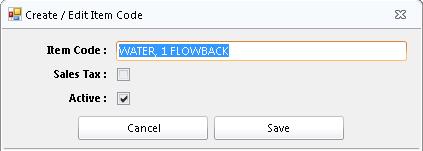
Item Codes
Item codes can be created three different ways. The first way is to manually create them by clicking on the New Item Code button. This will bring up a form allowing the user to enter the name of the item code and select if the item code is to use sales tax, and if the item code is active. Inactive item codes will not show up in any of the drop down list on job screens or the Job View Screen.
The second way to create item codes is through the import document located at http://www.osmpro.com/setup.html. Once the document has been completed please e-mail the completed packet to support@trinetica.com.
The final way item codes can be created is through the import service. If the import service does not find a corresponding item code it will automatically create the item code and set it active. It will not automatically set the use tax field.
To view or update item code information click on the ![]() button. This will bring up the Item Code Editor.
button. This will bring up the Item Code Editor.
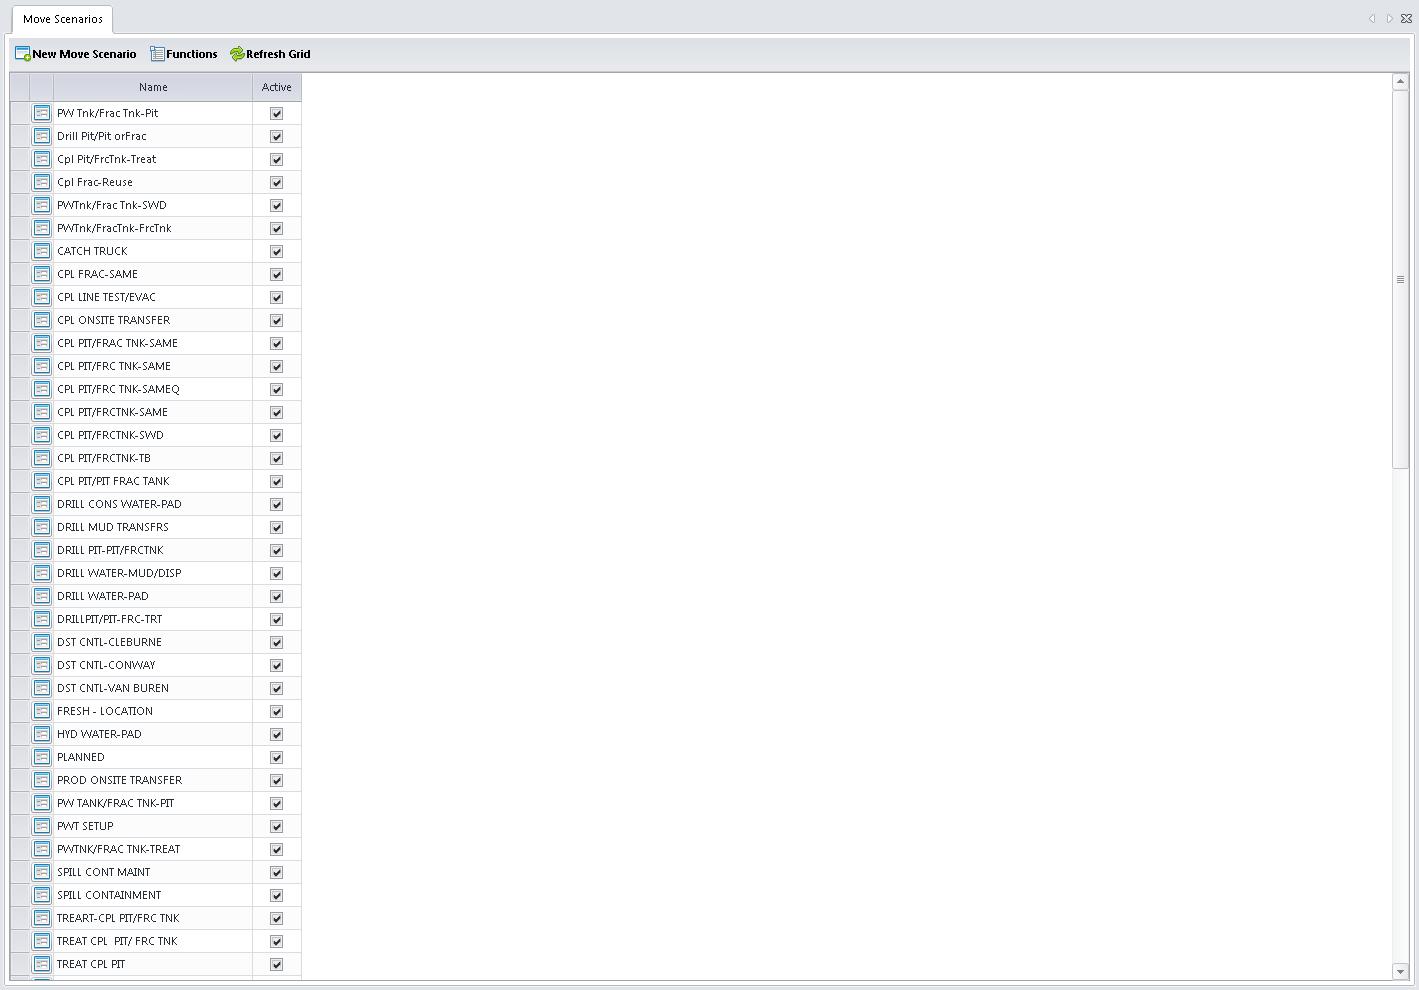
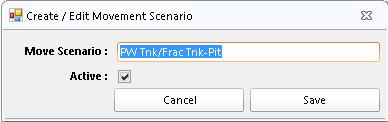
Movement Scenarios
Movement Scenarios can be created three different ways. The first way is to manually create them by clicking on the New Movement Scenario button. This will bring up a form allowing the user to enter the name of the movement scenario and select if the move scenario is active. Inactive movement scenarios will not show up in any of the drop down list on job screens or the Job View Screen.
The second way to create movement scenarios is through the import document located at http://www.osmpro.com/setup.html. Once the document has been completed please e-mail the completed packet to support@trinetica.com.
The final way movement scenarios can be created is through the import service. If the import service does not find a corresponding item code it will automatically create the move scenario and set it active.
To view or update movement scenario information click on the ![]() button. This will bring up the Movement Scenario Editor.
button. This will bring up the Movement Scenario Editor.
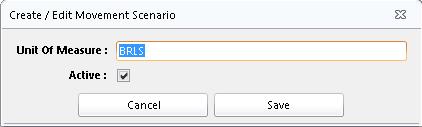
Units Of Measure
Units of measure can be created two different ways. The first way is to manually create them by clicking on the New Unit Of Measure button. This will bring up a form allowing the user to enter the name of the unit of measure and select if the unit of measure is active. Inactive unit of measure will not show up in any of the drop down list on job screens or the Job View Screen.

The second way to create units of measure is through the import document located at http://www.osmpro.com/setup.html. Once the document has been completed please e-mail the completed packet to support@trinetica.com.
To view or update units of measure information click on the ![]() button. This will bring up the Unit Of Measure Editor..
button. This will bring up the Unit Of Measure Editor..